.
| (h - larvae present
and growing)
When you find that
you have larvae in the substrate, be very careful in handling them.
If they appear to very newly hatched and have heads that are very large
in relation to their bodies, it is best to let them grow for a week or
two before attempting to move them (if you intend to separate them into
individual rearing containers).
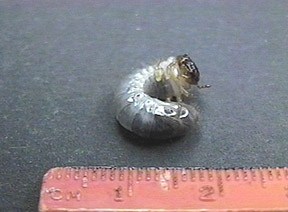
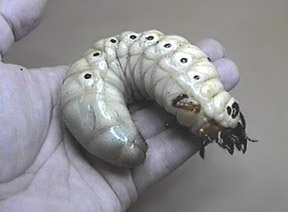
Once the larvae have
reached body proportions comparable to that of the early 1st instar larva
shown at right (fig. 27), you can safely transfer them into other containers
of substrate. |
|
.
| Fig.
27: An early 1st instar C. caucasus larva. Measurement
is shown in millimeters. |
|
.
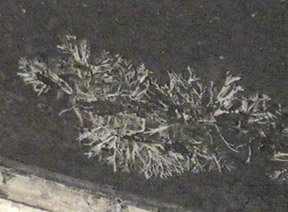
| Fig.
28: An outgrowth of fungal mycelia in a larval rearing terrarium.
Wood fungi are a normal factor in rearing substrate, and their presence
are not generally a reason for concern. There are certain parasitic
species of fungi known to attack scarab larvae. However, they occur
only very rarely, and so long as you make regular substrate changes, they
should never become a problem. |
|
| Most hobbyists prefer
to separate out the larvae of larger scarab species for two reasons:
(a) To prevent the
cannibalization that can occur in some species.
(b) To ensure that
the larva doesn't have to compete with any other larvae for food resources,
and thus reaches its maximum growth potential. However, so long as
an adequate amount of food is provided, some species actually appear to
grow better when reared together. |
|
| Before you place
the larva(e) into a new container(s) of substrate, there are a few simple
things that you should do to the substrate to get it prepared. Some
of the breeding terrarium's substrate (1 metric cup should suffice) should
be mixed into the substrate of the new rearing container in order to "seed"
it with any beneficial bacteria that may be present in the waste product
of the adult beetles.
Without these bacteria,
the larvae may possibly not be able to digest food properly, and will thus
not be capable of reaching maximum growth. In the wild, although
many scarab larvae live inside decaying logs where they feed mostly upon
wood, or in compost piles where they feed on decayed leaves and other plant
material, they also eat a lot of other things that they encounter such
as the fruits of fungus. Also, a few species have been observed eating
the larvae of other beetles as well as other small arthropods.
Scarab larvae grow
by means of 3 larval stages, called "instars". Each time an instar
is complete, the larva sheds its skin and head shield to reveal a new,
larger one beneath it. If high protein foods, along with a rich substrate
of decayed wood and leaves are not given to larvae during ALL of their
instars, maximum growth potential will usually not be reached. Thus
it is very important that you replace portions of the rearing substrate
as it becomes broken down by the feeding activity of the larva. The
intervals at which you change out the substrate will of course vary depending
on the amount of larvae you are rearing within a container, the size of
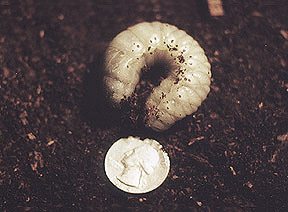
the container, and the size of the larva(e). Let us use the larva
of Chalcosoma caucasus (a large rhinoceros beetle of Malaysia) as
an example. By the time that a C. caucasus larva reaches the
mid-point in the 2nd instar stage, if you are growing it in a container
of substrate measuring about 12" X 8" X 8" (30.5 X 20.5 X 20.5 cm) you
would likely need to do a change of substrate about every 8 weeks. |
|
.
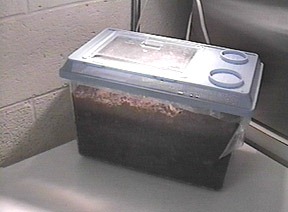
| Fig.
29: A typical plastic rearing box used for the development of a single
large scarab larva. This is the size and model which I used at my
workplace to rear the larvae of C. caucasus, and it measures 12"
X 8" X 8" (30.5 X 20.5 X 20.5 cm) in size. Popular terraria such
as these are sold in various sizes at most larger pet stores for the containment
of lizards, frogs, salamanders and any other small animal that requires
the kind of moist habitat which can easily be maintained within such a
container. Creating and maintaining appropriate moisture levels within
a box such as this is relatively easy (see photo below). |
.
.
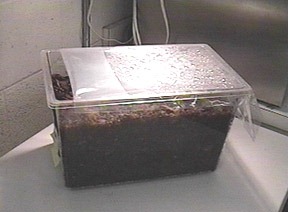
| Fig.
30: The same rearing box with the lid removed. The lids of
these types of boxes have far too much ventilation to be suitable for proper
maintenance of the humidity level required for beetle rearing substrate,
so about 90% of the box has been covered with a plastic bag. The
lid is then snapped back down over the plastic. Using the plastic
cover to retain moisture allows for periodic adjustment depending on the
amount of moisture you wish to keep inside or release from the container.
If the substrate appears too saturated, just fold back the plastic somewhat
for several days to allow extra evaporation. Folding it back so that
50% of the lid is ventilated should work in most instances. However,
always be sure that at least 10% of the lid space remains open at all times,
so as to allow for an exchange of air. |
|
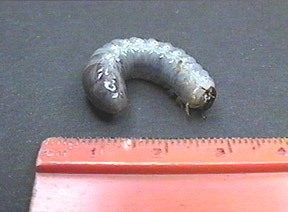
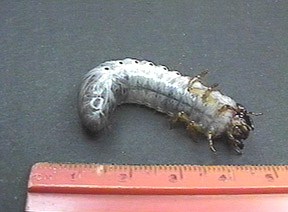
| -Developmental
stages of the Chalcosoma caucasus larva - |
.
| Fig.
31: Early 1st instar. |
|
.
| Fig.
32: Late 3rd instar. |
|
.
| Fig.
33: Early 2nd instar. |
|
.
| Fig.
34: Late 2nd instar. |
|
.
| Fig.
35: Early 3rd instar. |
|
.
| Fig.
36: Late 3rd instar. |
|
|
. |

 Back
to page 4 of the breeding manual
Back
to page 4 of the breeding manual